Hello dear friends,
Feminine use wings + color plalette
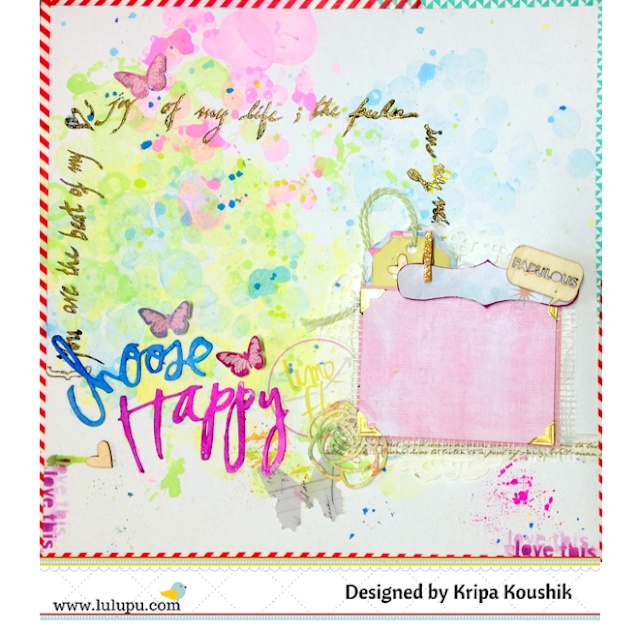
One of the reason I make scrapbook layouts, is to preserve memories, so this time I decided to make some memories while creating this mixed media layout with my kids. Read along for a tutorial.
Inspired by the soft colors in the mood board, I decided to go for a watercolor, dreamy and fun background. In a disposable container mix some bubble water and mist/ paint. Yes, you read that right, Bubble water😊 I made four cups of colored bubble water using mists and set the bubble station outside the house as it can get messy. My little helper was more than happy to blow a gazillion bubbles my way. Now if you don't want colour bubbles flying everywhere, then using a straw blow up bubbles in the container and take your paper on the bubbles, so the bubbles pop on the paper.We tried both techniques and ended up with this background. This is a canvas with gesso on it, but the technique worked well on plain cardstock and watercolour paper too.
Time to add details: The first thing I did was gesso the title, so that it would dry by the time I got the layers ready. Next, using the 'love this' diecut as a stencil, sponge some ink through it on the bottom two corners. Hand write journalling using the Zig Emboss Scroll and brush Twin tip marker and emboss it with gold super fine embossing powder. This pen writes clear, so you can easily emboss with any color embossing powder.
I want to change the photo in this layout every few months, so I started with a photo mat and used gold photo corners to easily slide and change photos. Ive used small pieces of cardboard to raise each paper layer. This also gives room to tuck in embellishments easily while keeping the layers flat.Now all thats left is to stick down the doily, papers and embellishments. All in
all, this layout took about two hours, with about 40mins on selecting embellishments and what to cut using the silhouette.
I hope today, you've
picked up a technique or tip that you can use or even just a smile at
the thought of popping colored bubbles on a paper. Hope to see your
beautiful creation linked here for this month's challenge : Wings plus colors from this mood board.

(Picture courtesy: http://southernpiphi.tumblr.com/page/2)
Supplies from the Lulupu Store:


This is gorgeous Kripa! Love how you experiment with techniques!
ReplyDelete